


Bringing you guys a super quick and super useful tutorial today. Made from the dreamy new collection by Teagan White, Fort Firefly, these nesting bins are equally cute & functional! I don’t now about y’all, but I’m always on the lookout for a cute way to bring a little more organization to my crafty chaos. These would also make an adorable baby shower gift – I can
just see them filled with tiny baby socks or as a diaper caddy on a changing table. So many uses!! I was able to make this 3 bin set in just a little over an hour. This is a great project for beginners – If you can sew a straight line, you can make these!!
Notes before you get started:
There are two ways to make this bin, both are equally simple! I will lay out both options and you can decide which works best for you. Pay attention to direction when you make your template and cut your fabric. The small portion of the template is the bin bottom, so orient your fabric accordingly. Use 1/2in seams unless otherwise stated. Outer, lining, and Pellon®
pieces are cut & sewn the same way. Whichever version you choose, cut your Pellon® to match your lining piece(s). I found it really fast to cut & sew all bins at the same time, assembly line style. I chose to make mine with the “non continuous” method because the fabric I’m using has a distinct direction.
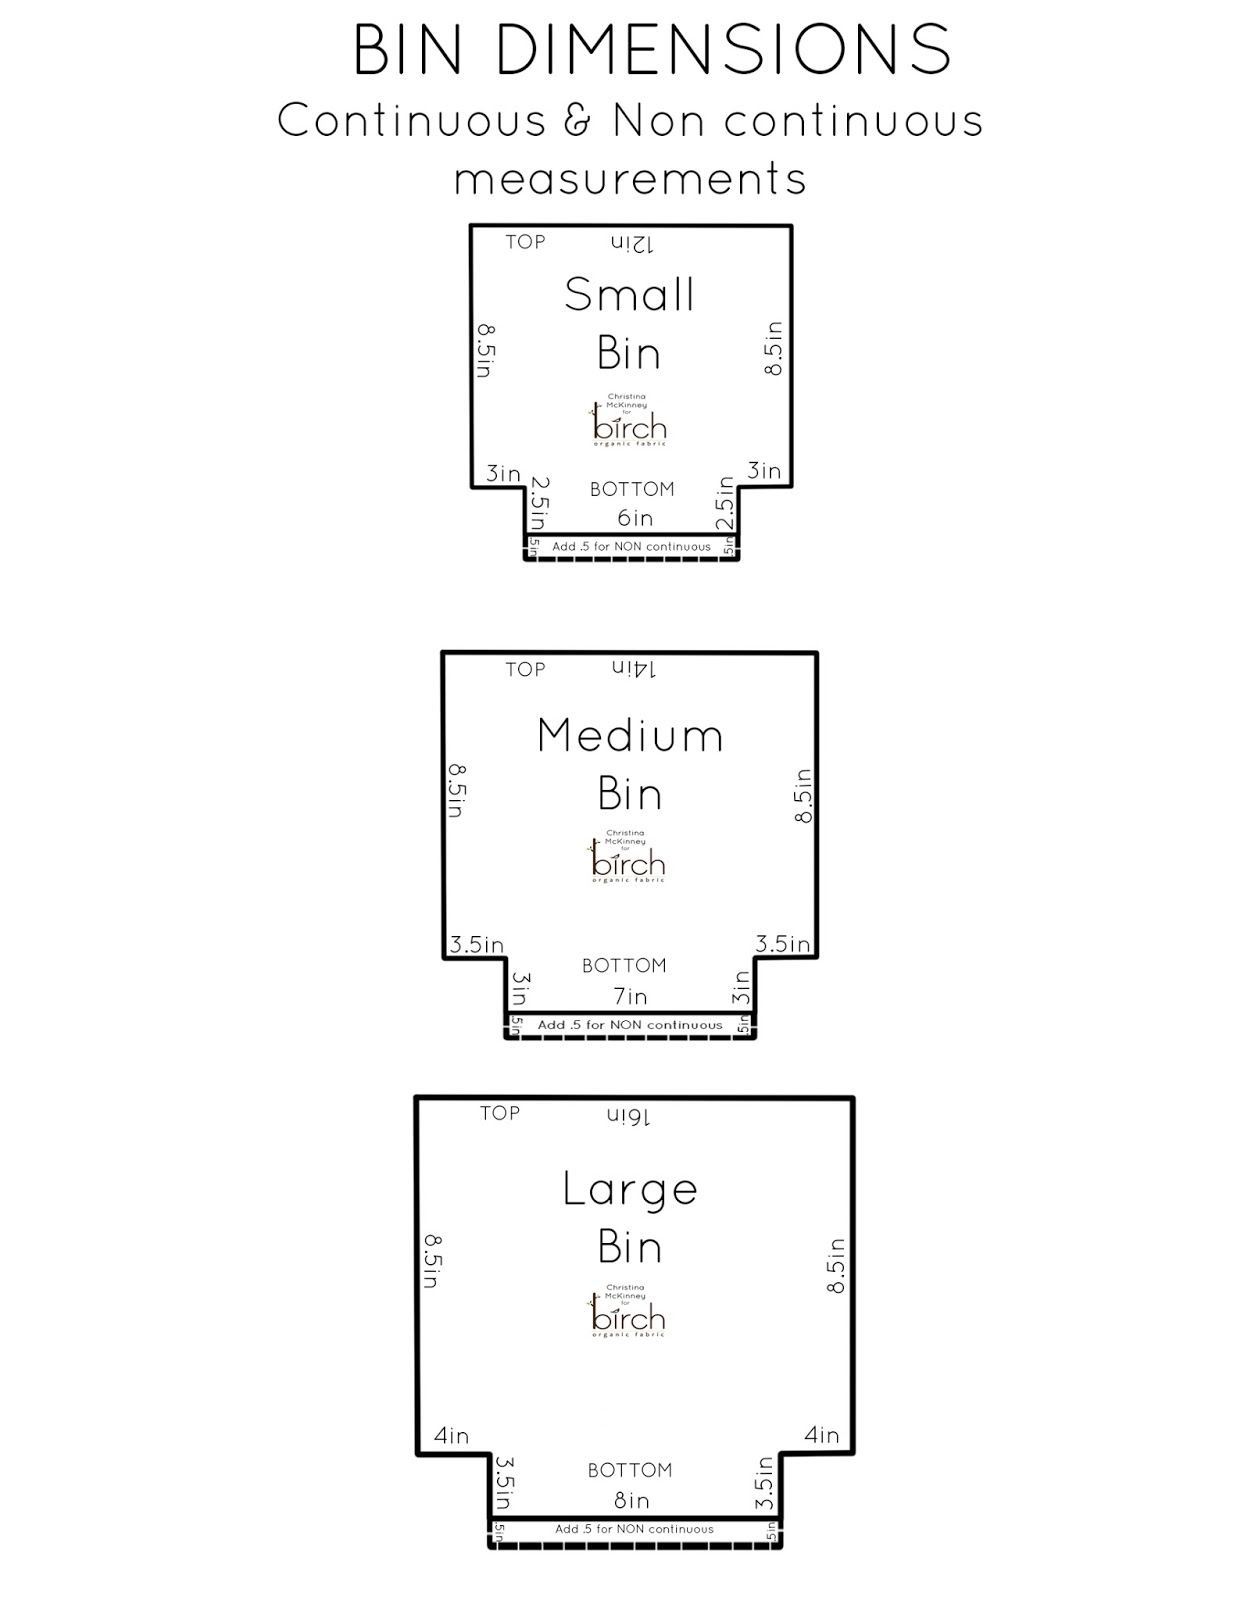
Finished Dimensions:
– Small: 5x6in base
– Medium: 6x7in base
– Large: 7x8in base
All bins measure 8in tall before folding down.
Supplies:
– 3 outer fabrics, 1/2 yd of each (You may need more, if your fabric is directional)
– 3 lining fabrics, 1/2 yd of each (You may need more, if your fabric is directional)
– 1 1/2 yrds fusible Pellon®, I used Décor Bond 809 for this. (You may need more if you’re using a type that is not 45 wide)
– Templates
I used Fort Firefly Fabric for all three bins.
First things first – you’ll need to make yourself a quick template for your 3 bins. Using the measurements provided, choose your method & sketch out your pattern pieces. (I used poster board to make mine!)
The two methods explained:
It is possible to cut this on the fold as one continuous piece. If your fabric has a non directional print, I recommend using this method. You will use the measurements given for “continuous” to create your template. When cutting, place your template on the fold & cut one.
For directional fabric, use the measurements given for “non continuous” to make your template. You will need to pay close attention to template placement on the fabric to make sure that half your bin is not upside down. For this, you are NOT cutting on the fold, you are cutting two separate pieces.
Assembly:
Cut all pieces according to your chosen method. You may notice I cut my lining upside down – I decided to do this so that when I flipped the edge over in the final step, the fabric would be right side up. (Read that a couple times, it makes sense I promise!)


Start by ironing your Pellon® to the wrong side of your LINING pieces. Quick note here – I know that typically you’d attach the Pellon® lining to the outer piece. However, I found that by attaching it to the inner pieces, you create a very stable inside that holds the outer piece tight as well.

(If you cut a continuous piece, skip the next two steps)
With right sides together, sew across the bottom, joining your two pieces. (The short side)

Press this seam open.

(This is where you pick up with the continuous method.) With right sides together, sew up each side. Press your side seams open.

You will now sew up the corners, forming your bin bottom. With the piece still inside out, you will press the two corners together and match up the bottom and side seam. Stitch along this edge.(If you are working with a continuous piece, you will match up the bottom center with the side seam.) Repeat with the remaining side.


Repeat this process with your lining fabric.
To join your outer and lining, turn your assembled lining right side out & your outer piece inside out. You will slip the outer piece over the lining, matching up your two side seams. They should now be right sides together.


Leaving yourself a 3 inch gap for turning, stitch around the top. Make sure to secure your start & stop stitches so they don’t pull out when you turn everything right side out.
Once stitched, pull everything right side out through your opening. Your liner should fit snugly down inside the outer piece. Make sure to push all corners out and match them up between the layers. At this point, I like to press the top seam. Make sure to fold under the fabric at your turning gap.


Pin your opening closed & stitch around the top edge of the bin, 1/4in from the edge.


Optional – Turn down the top edge 1-2 inches for a cute finish. I pressed this seam to give it a crisp edge.

Thanks for following along – Now go organize something!!


